Posted By TeckWrap Craft On December 18, 2025

You are very familiar with regular vinyl, glitter vinyl, holographic vinyl, color-changing vinyl, and many others. It is about time we dig deeper into what flocked iron-on vinyl is. How different is it from other vinyl types? When can you use it and where can you apply it to?
Flocked iron-on or heat transfer vinyl (HTV) is not a regular type of heat transfer vinyl. It has a different texture and is used for special crafting projects. If you want to learn more about flocked heat transfer vinyl, keep reading. You never know how much you might fall in love with this vinyl!
What Is Flocked Heat Transfer Vinyl?
Flocked iron-on or HTV is a fuzzy or furry heat transfer vinyl that is similar to suede or felt material. Because of its soft, fuzzy, and raised texture, it gives your design more depth and thickness. This special type of vinyl is relatively thicker than regular HTV.
Like most HTVs, you will also need an iron or heat press when applying flocked HTV. Flocked HTV can be applied to or used as an alternative to certain things such as:
-
Embroidery. Flocked HTV is a cheaper alternative for embroidery. This can be an alternative for uniform logos that can give a professional look while not spending too much.
-
Children’s clothes. Flocked HTV can be used to patch up holes in children’s clothes or as an extra fashion statement.
-
Sports apparel. Flocked HTV can make the names and numbers on sports hoodies, team shirts, and caps pop out.
Flocked HTV vinyl can be applied to the following base materials:
- 100% cotton fabric
- Polyester/cotton blends
- 100% polyester
- Leather
- Sublimated polyester
Smooth Heat Transfer Vinyl vs Flocked HTV
These two heat transfer vinyl types are different both in terms of texture and cut settings. Here are the differences between the two:
|
Table header 0
|
Flocked HTV
|
Smooth Vinyl
|
| Texture |
Fuzzy and tough |
Smooth and delicate |
| Cutting Machine Settings |
Need to increase the blade’s penetration level |
Normal cut setting |
How Do You Cut Flocked Vinyl With A Cutting Machine?
To cut flocked vinyl, you first need to set up your work area and prepare the tools you need. Here are the tools necessary for cutting flocked vinyl:
Here are the steps on how to cut flocked HTV using Cricut cutting machine:
- Position the flocked HTV on the cutting mat. The material shiny side of the vinyl should face down on the mat.
- Attach the fine-point blade to your cutting machine.
- With your Cricut Design Space, mirror your design before cutting
- Flocked vinyl is thicker than regular vinyl, you need to switch the settings to iron-on for more pressure.
- Insert the cutting mat with vinyl into the cutting machine. You may remove the mat once the cutting is complete. You can then proceed to weed your decal.
In weeding your decal, you have to remember that weeding flocked vinyl is similar to weeding regular vinyl. Though, with weeding flocked HTV you have to be cautious. Some of the fuzz may remain on the sticky part of the liner which could cause it to be less sticky after weeding.
Steps On How To Apply Flocked Vinyl Using A Heat Press
Flocked heat transfer vinyl can be applied to shirts, tote bags, blankets, hats, and many other fabric types. Once the decal is cut and weeded, it is now ready to be applied to a surface using a heat press. Here are the steps in making a heat pressed shirt with flocked vinyl:
-
Step 1: You need to preheat the fabric using a heat press to remove the moisture and wrinkles. You can apply medium pressure with a temperature setting of 320°F for 15-20 seconds.
-
Step 2: Position your decal onto the fabric. You may place a folded towel or liner over the decal before pressing down the heat press.
-
Step 3: Apply more heat and pressure if you see some corners have not completely adhered.
-
Step 4: Press according to the duration and temperature recommended by the vinyl brand you are using. After pressing, you can remove the liner from the fabric.
-
Step 5: Wait for the decal to cool down before removing the backing paper. This is especially true for cold peel types of vinyl, such as Teckwrap vinyl.
-
Step 6: Wait for the vinyl to cure for at least 24 hours before washing the fabric. Use only warm or cold water and a mild detergent when washing fabrics with HTV. If it is a shirt, turn it inside-out and tumble dry.
Project Ideas Using Flocked Heat Transfer Vinyl
There are so many things you can do with flock heat transfer vinyl. You can customize materials for both personal use and as a gift idea. Flock vinyl is also versatile because it can easily be paired with fabrics and other soft materials. Here are some project ideas to spark your imagination:
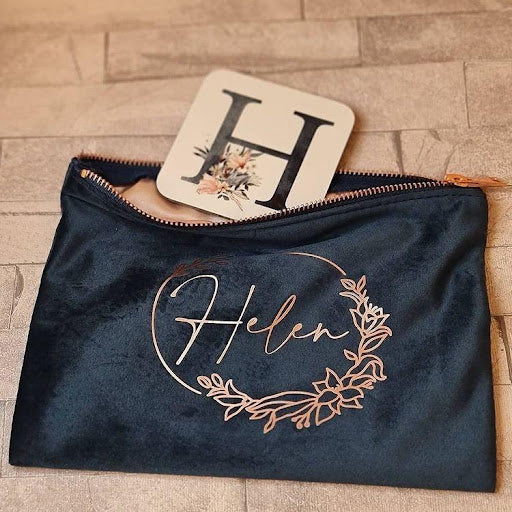
Women’s Pouch
Women often carry around small pouches to store their personal belongings. To make it personalized, you can design it with their names or their initials. You may use flock HTV in the color yellow like the sample below.

Face Mask
The COVID-19 pandemic is still far from over. A personalized face mask is a good gift idea to give away to family and friends. You can personalize it with beautiful quotations just like the sample below. You may try using flock HTV in pink which looks good both in dark or light-colored masks.

Tote Bags
Tote bags are good gift ideas to give out during birthdays or Halloween. They can be filled up with lots of treats. You can try using flock vinyl alongside a metallic vinyl to make the design interesting.

Socks
Socks are commonly used garments by kids. You can personalize your children’s socks with their names so you can easily pair them after laundry. You can try either white or black flock HTV for this. You may also use a combination of flock vinyl and glitter vinyl in customizing holiday socks just like the sample Christmas socks below.

Pajamas
Nothing could be more comfortable than a pair of personalized pajamas. You can gift newlywed couples with their personalized pajamas labeled with “Mr” and “Mrs” using flock vinyl. White flock vinyl would look nice on a dark-colored pajama.

Pillowcase
Pillows are soft and cuddly. It would be nice to personalize pillowcases with a soft and suede-like material that is nice to sleep on. You can’t go wrong when you use a flock HTV for this type of project.

Single Image Shirts
Young kids like wearing shirts that have the face of their favorite animal or cartoon character. It would be a bonus if the decal is nice and soft to touch. A flocked HTV will go well with this kind of project.

Can You Layer Flocked Vinyl?
Yes, you may layer flocked vinyl on top of other vinyl. Flocked HTV vinyl can be a base layer for other vinyl. You may use flocked vinyl as a border around texts or an image which can make your design pop out more. When layering, there are several factors to take into consideration such as temperature, duration, pressure, and use of protective cloth. A lot can go wrong if you mess up the temperature setting, duration of press, and pressure intensity.
In working with multiple layers, the first layer receives the most heat and pressure. For instance, if you are working on four layers with 15 seconds of pressing time for each layer, the first layer was pressed for a total of one minute. Pressing vinyl this long will not come out looking good.
Also, pressing for too long may result in shrinkage. It is advisable to heat every layer for one to five seconds. Always use a Teflon sheet, or cotton fabric to protect the heat plate and to ensure that nothing is scorched.
Sublimation And Flocked Vinyl
Another reason why flock vinyl is awesome to use is that you can apply sublimation ink on it! With flocked heat transfer vinyl you can do a sublimation design on a shirt. Here are the supplies needed for this process:
- Shirt with flock vinyl
- Sublimation ink
- Heat press
- Heat press mat
- Butcher paper
- Heat resistant tape

Here are the steps in adding sublimation on flocked HTV:
- You can make your design using a sublimation printer. Let the ink side of the sublimation face down onto the vinyl and secure it using heat-resistant tape.
- Position the heat press mat inside the shirt and cover it with butcher paper. Also, add butcher paper over the vinyl and sublimation. The butcher paper will protect the shirt from the sublimation ink.
- Your sublimation paper should come with package instructions as to how long to press and the temperature setting. Press according to the specified instructions. After which, you can remove the butcher paper to reveal the design.
Care Instructions
To ensure that your fabrics with flock vinyl will last, here are some recommendations on how to take care of them:

- Wash fabrics after 24 - 48 hours
- Turn the T-shirts inside out
- Wash using cold water
- Use mild detergent
- Hang dry
- Don’t use bleach or chlorine
Frequently Asked Questions
What does flocked iron-on mean?
Flocked iron-on means a type of heat transfer vinyl that has a fuzzy or furry texture. This texture is raised giving your design depth and dimension. The texture is similar to felt or suede and is much thicker than regular heat transfer vinyl.
How do you use flocked iron-on?
You use flocked heat transfer vinyl by exposing the surface, particularly fabric to a heat press or iron. The surface needs to be pre-heated to eliminate wrinkles and moisture. Position the decal on the surface and cover it with a liner, Teflon paper, or parchment paper. Press down with medium pressure for 15-20 seconds at a temperature of 320°F. Let the decal cool down before peeling.
What is the difference between flocked and solid vinyl?
The difference between flocked and solid vinyl is primarily its texture. Flocked vinyl is fuzzier and tough while solid or smooth vinyl is flat, smooth, and delicate. Solid vinyl is cut using normal cut settings while flocked vinyl requires increased blade penetration due to its textured surface.
What Cricut setting for flocked HTV?
The ideal Cricut setting for flocked HTV is exposing the vinyl to 320°F for 15-20 seconds with medium pressure applied.
Final Words
TeckWrap Craft offers several flocked HTV colors for tons of projects you can make. You don’t have to scout elsewhere for TeckWrap Craft has it all. Flock vinyl is a fun and interesting vinyl to work with. Try it and be amazed at how it can help make you a better and more skilled crafter. For your flocked vinyl craft projects, do tag @teckwrapcraft to share your amazing work.


