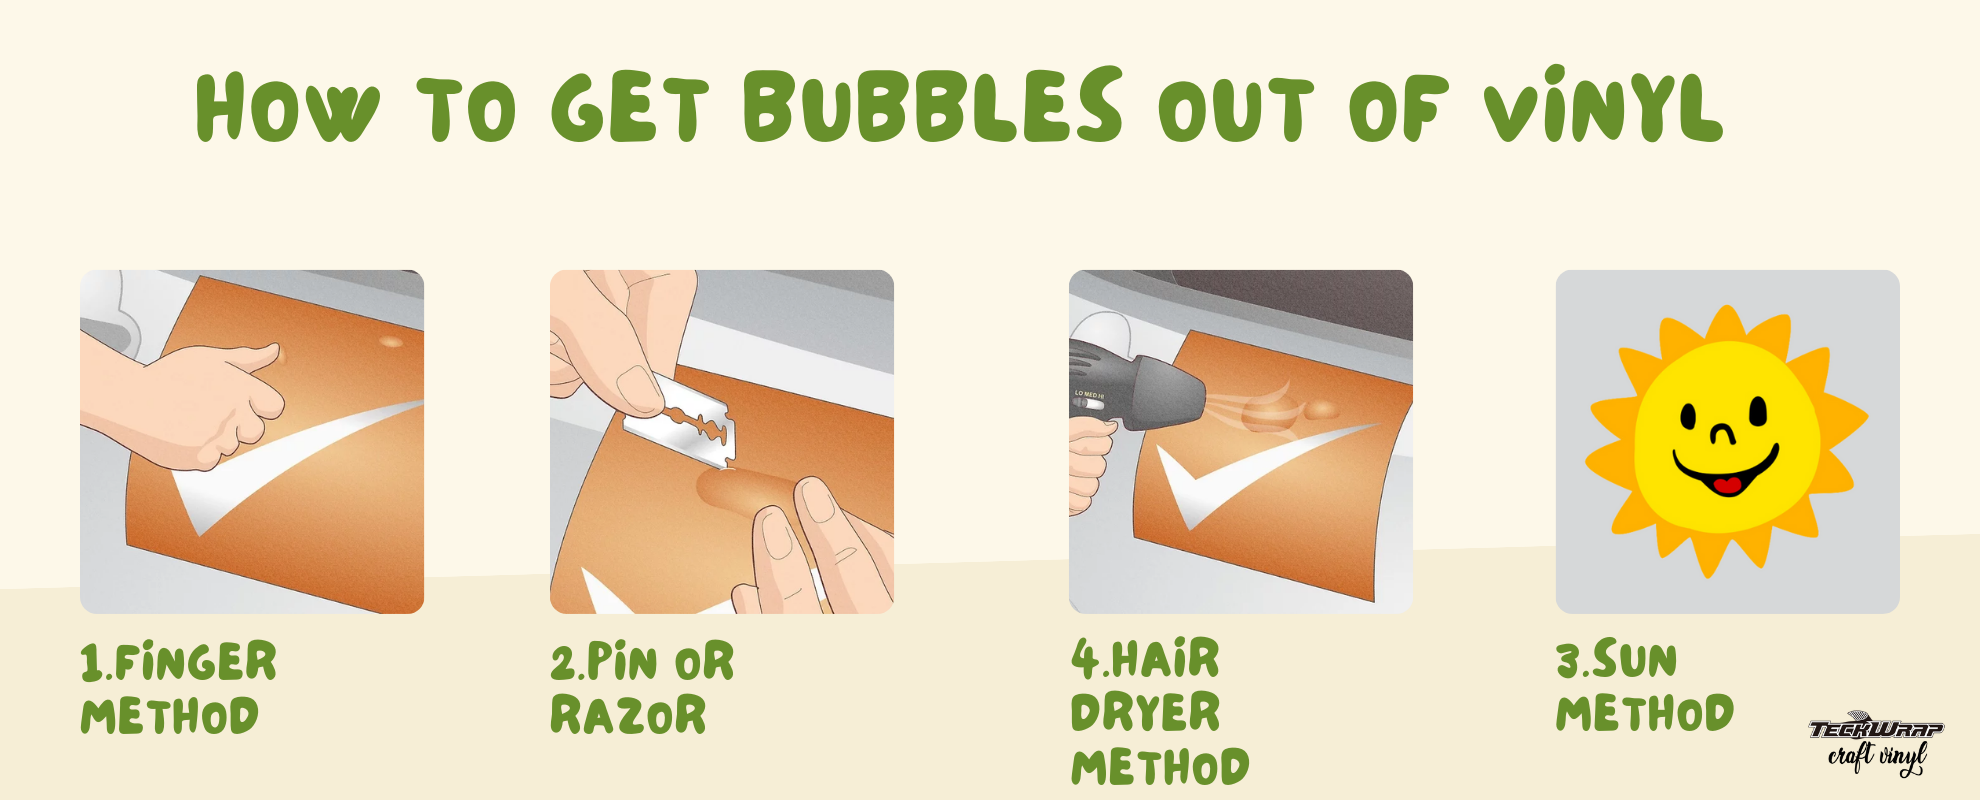
Push small bubbles toward the nearest edge using a squeegee or your fingertip. For bubbles that will not move, use a fine pin or weeding tool to make a tiny puncture at the edge of the bubble, then press the air out gently toward the edge. For large or stubborn bubbles, apply gentle heat from a hair dryer at 15 cm distance for 5 to 10 seconds, then press with a squeegee while the vinyl is still warm. Small fresh bubbles often settle on their own within 1 to 2 weeks in a warm room.
Air bubbles under vinyl are one of the most common issues in vinyl application, and every method below fixes them without damaging the vinyl or leaving marks. The right method depends on the size of the bubble, how long the vinyl has been applied, and the surface type. This guide covers all five methods, when to use each one, how to prevent bubbles in the first place, and the answers to the most common questions.
Understanding why bubbles form helps you choose the right fix and avoid the same problem next time.
Surface contamination. Dust, fingerprints, grease, or moisture on the surface prevent the adhesive from bonding flat. Even a clean-looking surface can have invisible oils from handling that cause bubbles.
Application technique. Peeling the backing too quickly instead of applying the vinyl gradually, not working from one edge across the surface, and applying uneven pressure during installation all trap air under the vinyl.
Skipping the squeegee. Pressing vinyl down by hand without a squeegee leaves areas where the adhesive has not fully bonded. These areas form bubbles within hours or days of application.
Temperature and humidity. Applying vinyl in a cold room causes the adhesive to bond slowly and can trap air. In very humid conditions, moisture on the surface affects the adhesive bond.
Surface texture. Textured or slightly rough surfaces do not allow the vinyl to make complete flat contact. Air gets trapped in the gaps between the vinyl and the surface peaks.
5 Methods to Remove Vinyl Bubbles: At a Glance
Use this table to find the right method for your situation before reading the full instructions below.
Method
Best For
Tools Needed
Time
Risk
Squeegee or scraper
Small fresh bubbles near edges
Squeegee or credit card
1 to 2 min
None
Pin puncture
Small stubborn bubbles anywhere
Fine pin or weeding tool
2 to 3 min
Very low
Hair dryer or heat gun
Large or stiff bubbles
Hair dryer or heat gun
3 to 5 min
Low if used correctly
Sunlight and warmth
Multiple small bubbles, fresh vinyl
None
1 to 2 weeks
None
Remove and re-apply
Severe bubbling across whole design
Isopropyl alcohol, squeegee
15 to 30 min
Low
Method 1: Squeegee or Scraper
This is the first method to try for any bubble. A squeegee is a flat tool with a soft felt or rubber edge that presses the vinyl flat without scratching the surface. Any rigid flat-edged object works in a similar way: a credit card, a plastic card, or a TeckWrap craft squeegee.
1 Push the Bubble Toward the Edge
Hold the squeegee at a low angle against the vinyl surface. Place it behind the bubble, away from the nearest edge. Apply firm, steady pressure and push the bubble toward the nearest edge in one smooth motion. Do not press directly down on the center of the bubble. This pushes air deeper under the vinyl. Always work from the center outward toward the edges.
Position the squeegee behind the bubble. Hold it at a 45-degree angle to the surface, not straight up.
Push in one direction toward the nearest edge. Do not push back and forth across the bubble.
Apply firm but controlled pressure. Too much pressure stretches the vinyl and creates wrinkles.
Check that the vinyl edge is not sealed tightly. If air cannot escape, lift the edge slightly with a weeding tool before pushing the bubble toward it.
Tip: If pushing the bubble toward one edge creates a new bubble on the other side, you are applying too much pressure. Reduce pressure and make shorter, more controlled strokes.
Method 2: Pin Puncture
When a squeegee does not move the bubble because it is in the middle of the design or the adhesive has stiffened, a pin puncture releases the trapped air without leaving a visible mark. The hole made by a fine pin is too small to see with the naked eye once the vinyl is pressed flat.
2 Puncture and Flatten the Bubble
Use a fine pin, needle, or the tip of a weeding tool. Hold the pin at a very shallow angle to the vinyl surface, almost parallel to it. Poke a single small hole at the edge of the bubble, not the center. A hole at the edge gives the air a shorter path to escape and reduces the risk of the hole being visible. Press the bubble flat immediately using your fingertip, working from the opposite side toward the puncture point.
Hold the pin almost parallel to the surface. A shallow angle keeps the puncture very small and prevents the tip from reaching the surface underneath.
Poke one hole at the edge of the bubble, not the center. Air escapes more easily from the edge.
Press the vinyl flat from the far side of the bubble. Work toward the puncture point so air is directed out through the hole.
Use a squeegee to smooth the area flat. Apply gentle pressure from the opposite side toward the hole until the vinyl lies completely flat.
Tip: One small hole at the edge of the bubble is enough. Pressing firmly from the other side forces the air out cleanly. The hole will not be visible once the vinyl is flat.
Method 3: Hair Dryer or Heat Gun
Heat softens the vinyl film and makes it more flexible, which allows stubborn bubbles to be pressed flat that would not move with a squeegee alone. This method works well for large bubbles, bubbles in thick vinyl, and bubbles on textured or curved surfaces.
Heat Safety: Use Low Setting Only
Safe heat range for adhesive vinyl: 100 to 120 degrees F (38 to 49 degrees C). Hold the hair dryer or heat gun at least 15 cm from the surface. Keep it moving in a circular motion. Never hold it stationary on one spot. Stop immediately if the vinyl shows any bubbling, discoloration, or wrinkling at the edges.
3 Apply Heat and Press Flat
Set a hair dryer or heat gun to the low heat setting. A hair dryer is safer than a heat gun because it reaches lower maximum temperatures. Hold it at least 15 cm from the vinyl and move in a slow circular motion over the bubble area for 5 to 10 seconds. The vinyl will visibly soften and become more pliable. While the vinyl is still warm, use a squeegee to press the bubble toward the nearest edge.
Set the hair dryer to low heat. The lowest setting is sufficient to soften adhesive vinyl.
Hold at 15 cm and keep moving in a circular pattern. Never hold stationary. 5 to 10 seconds is enough per area.
Press with a squeegee while the vinyl is still warm. The window for pressing is short. Act immediately after applying heat.
Let the vinyl cool and check the result. If the bubble has reduced but not cleared, repeat the heat and press process once more.
Tip: A hair dryer on low is safer than a heat gun for adhesive vinyl. If using a heat gun, use the lowest setting, keep it moving, and never hold it closer than 15 cm from the surface.
Method 4: Sunlight & Warmth
Small fresh bubbles in newly applied vinyl will often disappear on their own when left in a warm environment. The warmth softens the adhesive gradually, and as it becomes more tacky, it pulls the vinyl flat against the surface from the inside.
Place the project in a warm room or near indirect sunlight for 1 to 2 weeks. Avoid direct sunlight on coloured vinyl as extended UV exposure can affect some vinyl finishes over time. Once the bubbles have reduced or disappeared, press the vinyl flat with your thumb to complete the bond.
This method only works on fresh applications where the adhesive has not yet fully cured. For bubbles that are weeks or months old, the adhesive has hardened and passive warmth will not help.
Method 5: Remove and Re-apply
If the vinyl has multiple large bubbles across the design, or if previous fix attempts have stretched or creased the vinyl, re-applying gives a better result than continuing to work on the existing application.
5 Remove and Re-apply the Design
This is the right choice when the bubbling is severe enough that individual fixes will not produce a clean-looking finish. Re-applying correctly takes 15 to 30 minutes and gives a fresh start.
Warm the vinyl with a hair dryer. 30 to 40 seconds of low heat softens the adhesive and makes peeling easier without stretching the vinyl film.
Peel slowly at a low angle. Work from one corner across the design. Keep the peel close to the surface rather than pulling straight up.
Clean the surface with isopropyl alcohol. Remove all adhesive residue, fingerprints, and dust. Let the surface dry fully before re-applying.
Re-apply using proper technique. Start from one edge and use a squeegee to press the vinyl flat as you gradually lay it down, working from one side to the other.
Will Vinyl Bubbles Go Away on Their Own?
Small bubbles in a fresh vinyl application often disappear on their own within 1 to 2 weeks. As the adhesive continues to cure and bond with the surface, it gradually pulls the vinyl flat. Placing the project in a warm room speeds this process.
Large bubbles will not go away on their own regardless of time. If a bubble is larger than about 5mm across, it contains enough air to prevent the surrounding adhesive from pulling the vinyl flat naturally. Use one of the active methods above.
Bubbles in vinyl that has been applied for more than a few weeks are unlikely to self-heal. The adhesive has already partially cured around the bubble, which locks it in place. At that point, a pin puncture or heat method is the only practical fix.
Rule of thumb: If the bubble is smaller than 5mm and the vinyl was applied within the last 2 weeks, leave it in a warm room for a week and check again. If the bubble is larger than 5mm or the vinyl has been applied for more than a few weeks, use the pin or heat method.
TeckWrap Bubble Free Vinyl
TeckWrap Bubble Free vinyl has micro air channels built into the adhesive layer. These channels allow air to escape through the adhesive during and after application, significantly reducing bubble formation. Bubble Free vinyl is designed for larger surfaces where perfectly even squeegee pressure is harder to maintain, such as wall decals, vehicle graphics, and large signage.
When using Bubble Free vinyl, many of the small bubbles that appear during application will release themselves through the air channels within a few hours. A squeegee is still the correct tool to apply it, but air that does get trapped under the vinyl has a way out.
How to Prevent Bubbles When Applying Vinyl
The best fix for bubbles is not getting them in the first place. These steps prevent most bubbles during application.
Clean the surface thoroughly before applying. Wipe with isopropyl alcohol and a clean lint-free cloth. Remove all dust, grease, moisture, and fingerprints. Let the surface dry completely before starting.
Work in a warm room. Vinyl adhesive activates better in a warm environment. Room temperature of 18 to 25 degrees C (65 to 77 degrees F) is ideal for application.
Start from one edge and work across. Do not lay the entire design down at once. Peel the backing gradually as you press the vinyl down, starting from one edge and moving to the opposite side.
Use a squeegee, not your hand. A squeegee applies even pressure across the entire vinyl surface. Using your hand leaves uneven pressure points where air remains trapped.
Work from the center outward. On large designs, press from the center of the design toward the edges so air is pushed out rather than trapped inside.
Use wet application for very large decals. Apply a small amount of dish soap mixed with water to the surface. Lay the vinyl down and use a squeegee to press it flat and force the soapy water out from under the design. Let it dry for 24 to 48 hours before the adhesive fully bonds.
Frequently Asked Questions
Small bubbles in a fresh vinyl application often disappear on their own within 1 to 2 weeks as the adhesive cures and pulls the vinyl flat. Large bubbles will not go away on their own. Bubbles in vinyl applied more than a few weeks ago are also unlikely to self-heal, as the adhesive has partially set around them.
The squeegee method works best for wall vinyl. Position the squeegee behind the bubble and push toward the nearest edge with firm, steady pressure. For stubborn bubbles, use a fine pin to puncture the edge of the bubble and press the air out. Apply gentle heat from a hair dryer if the wall vinyl is thick or has been applied for a while.
The most common causes are: surface contamination before application (dust, grease, moisture), applying vinyl too quickly without working from one edge, not using a squeegee, applying in a cold room, and textured surfaces that prevent full contact between the vinyl and the substrate.
Yes. Dried or cured vinyl bubbles can still be fixed using the pin puncture method or gentle heat. The squeegee-only method becomes less effective once the adhesive has cured around the bubble. A pin puncture at the edge followed by pressing flat with a squeegee is the most reliable fix for older bubbles.
Set the heat gun to the lowest heat setting. Hold it at least 15 cm from the vinyl and move in a slow circular motion over the bubble area for 5 to 10 seconds. While still warm, press the bubble toward the nearest edge with a squeegee. Do not hold the heat gun stationary and stop immediately if the vinyl shows any discoloration or wrinkling.
Apply heat from a heat gun at low setting (15 cm distance, circular motion) to soften the wrap, then press the bubble out toward the nearest edge with a squeegee. For small bubbles, a pin puncture at the edge of the bubble followed by firm pressing is the most effective method without damaging the wrap surface.
Vinyl that continues to bubble usually has a surface contamination issue. Grease, silicone residue, wax, or moisture prevents the adhesive from forming a stable bond. Clean the surface thoroughly with isopropyl alcohol, let it dry completely, and re-apply. In some cases, the surface has an incompatible coating that adhesive vinyl will not bond with.
TeckWrap Bubble Free vinyl has micro air channels built into the adhesive layer that allow air to escape during and after application. This significantly reduces bubble formation on large surfaces. Standard TeckWrap adhesive vinyl does not have air channels, so proper squeegee technique is important during application.
Wrapping Up
Vinyl bubbles are fixable regardless of how long the vinyl has been applied. For small fresh bubbles, a squeegee is the fastest fix. For stubborn small bubbles anywhere on the design, a pin puncture takes under a minute and leaves no visible mark. For large or stiff bubbles, a hair dryer on low softens the vinyl enough to press flat. When bubbling is widespread, re-applying after a thorough surface clean gives the best result.
TeckWrap Bubble Free vinyl reduces bubble formation on large surfaces from the start. For standard adhesive vinyl, correct surface preparation and squeegee technique prevent most bubbles before they form.
I love the quality of tech wrap. It cuts in weeds so nicely I got the bundle so I could have a little bit of all the different colors. It’s a great great product although when I did get my kit, they didn’t put my weed pen and my slap bracelets. I didn’t get those little extras. They forgot to put it in my package and I also got the other tech wrap bundle, which is the shiny iridescent bubble free bundle that comes with the weeding pen slap bracelets in the hanger so you can put all your rolls inside the hanger hanging on the back of your door. I did get that stuff in my bundle. I would definitely recommend tech wrap. It’s a great quality and priced decently.
First and last time I tried this. I followed instructions, watched videos and it still did not work. It would not come off the transfer mask and totally ruined the print and the garment so now I have to buy a new one