Posted By TeckWrap Craft On April 28, 2022
Iron-on Vinyl: Which Side Faces Down The Cutting Mat?

Table of Contents
- Common HTV Terms
- What Is Heat Transfer Vinyl?
- Parts Of A Heat Transfer Vinyl: The Carrier Sheet And Adhesive
- Do You Mirror Heat Transfer Vinyl?
- What Heat Transfer Vinyl Is Best?
- What Fabrics Can You Use Heat Transfer Vinyl On?
- What Are The Supplies Needed For Heat Transfer Printing?
- Step-By_Step Instructions On How To Print Iron-On Vinyl On Garments
- Care Instructions For T-Shirts Printed With Heat Transfer Vinyl
- Don’t Wash The Garment For At Least 24 Hours After Pressing
- Always Wash And Dry With The inside Out
- Use Warm Or Cold Water For Washing
- Do Not Dry Clean
- Only Use Mild Detergent
- Do Not Iron The Iron-On Vinyl Directly
- Project Ideas Using Iron-On Vinyl
Many crafters ask this question: For iron-on vinyl, which side down faces the cutting mat? Let’s cut to the chase and clear this dilemma once and for all. The side of the iron-on vinyl or heat transfer vinyl that faces down is the carrier sheet side or the shiny side.
The carrier sheet serves as the barrier between the heat press machine and the actual vinyl decal. That’s why in the cutting machine, the carrier sheet faces the cutting mat or faces down. While the dull side (which is the actual vinyl) faces the blade of the cutting machine.
Remember that this tip only applies to heat transfer vinyl (HTV) or iron-on vinyl. This concept does not apply to adhesive vinyl for crafts like tumblers or mugs. With adhesive vinyl (removable or permanent vinyl) it’s the other way around.
Now that we’ve cleared up the air. It’s time to learn a thorough explanation of why the carrier sheet or shiny side faces down. In this crafting guide, you’ll also learn other facts and tips when working around heat transfer vinyl.
Common HTV Terms
Before proceeding to other facts about heat transfer vinyl and its usage in the printing industry, there are some terms that you need to understand. Which will be simultaneously used in this post. Here are some common HTV terms you should learn about and their definition:
- Heat Transfer Vinyl: Also called HTV or iron-on vinyl is used to print on garments or fabrics.
- Clear carrier sheet: Also called the carrier side, clear plastic liner, the shiny side, or the glossy side of the vinyl. The clear carrier side is tacky or smooth. Carrier sheets come in different backings — low, medium, and high-tack backing. High-tack backings are the HTV of choice for intricate designs.
- Cavities: The cavities are the center portions of the design. It is the excess vinyl inside the designs or letters. It is the more challenging excess vinyl that needs to be removed in the weeding process.
- Peel: HTVs are classified into hot, warm, or cold peels. After pressing the vinyl on the garment, you need to peel the carrier sheet away if the plastic sheet is still cold, hot, or warm. Make sure to check out the product instructions of the HTV.
- Hot Peel: For HTVs classified as hot peel, you have to peel the clear plastic carrier sheet right away when it’s still hot. Remove the backing immediately after pressing.
- Warm Peel: For HTVs classified as warm peel, you have to peel the plastic backing when it’s warm. Wait around 15-30 seconds before removing the carrier sheet.
- Cold Peel: For HTVs classified as cold peel, you have to peel the plastic backing when the carrier sheet is completely cold. Wait at least one minute after pressing before removing the plastic backing.
- Vinyl Cutter or Cutting Machine: A vinyl cutter is a type of machine used to cut vinyl. Simply upload a design on your computer, load the vinyl, and let the cutting machine do its work.
- Weeding: Weeding is a process wherein the excess vinyl that you don’t want to be transferred on a garment is removed.
What Is Heat Transfer Vinyl?
Heat transfer vinyl is a type of vinyl used to print on garments like T-shirts, pillowcases, and canvas materials. HTV has a heat-activated backing allowing the vinyl to permanently transfer onto the garment.
In order to pursue this type of project, you’ll be needing a vinyl cutter like Cricut, Brother, or Silhouette cutting machine. Also, to transfer the design you’ll be needing either a heat press machine, EasyPress machine, or regular household iron.
Although a household iron does the trick, it’s suggested to use a heat press machine. The combination of the right time, heat, and pressure will transfer the vinyl layer well to the garment with exceptional durability.
So if you’re thinking of printing garments or would want to start a clothing brand, a cutting machine and heat press machine should be on your priority list on the things you should invest in.
Parts Of A Heat Transfer Vinyl: The Carrier Sheet And Adhesive
In order for you to understand why the shiny or glossy side comes down, you should get a clear picture of the heat transfer material and its parts. It has two parts — the plastic carrier sheet and the actual vinyl (the decal that transfers to the garment). See the photo below.

The HTV’s shiny plastic carrier sheet serves as the barrier between the actual vinyl and the heat press machine. At the same time, the base that keeps the decal intact. The vinyl layers that transfer to the garment have a heat-activated adhesive.
Under the heat press machine, with the right pressure, time, and temperature, the vinyl transfers to the garment. The key point you should take note of is, that there are two layers on an HTV:
- Vinyl shiny side: Goes down the cutting mat
- Vinyl full side: Face the cutting blade of the cutting machine
Do You Mirror Heat Transfer Vinyl?
Now that you understand the parts of a heat transfer vinyl, you now understand why the shiny side goes down, facing the cutting mat. Speaking of this, there’s one thing you should remember regarding heat transfer vinyl — you should always mirror heat transfer vinyl.
As explained, since the shiny side goes down, the design on the cutting machine’s software should be mirrored or ‘Flipped Horizontally’. Make sure to read this post Do You Mirror Iron-on Vinyl?.
What Heat Transfer Vinyl Is Best?
As an aspiring or long-time crafter, it is important to find the best quality vinyl in the market. What should you look for in a heat transfer vinyl supplier? Here are some key points you should remember:

- It should be compatible with all sorts of fabrics (cotton, polyester, canvas, etc)
- Available in different colors, patterns, and textures
- Affordable and can easily be purchased
- Compatible with most cutting machines
- Comes with clear and direct usage instructions
- Soft hand vinyl for cotton shirts
- Stretch and rebound HTVs for activewear
 For Shirts")
Look no further, TeckWrap Craft Vinyl is at your service. TeckWrap Craft offers a variety of heat transfer vinyl that comes in different colors and textures. You will never run out of unique project designs if you use TeckWrap Craft heat transfer vinyl. Here are several heat transfer vinyl products available at TeckWrap Craft.
What Fabrics Can You Use Heat Transfer Vinyl On?
You can use HTV on different kinds of fabric. HTV works best on cotton, polyester, cotton/poly blends, and canvas. What about synthetic fiber? Can you use heat transfer vinyl on synthetic fibers? It’s a case-to-case scenario.

What Are The Supplies Needed For Heat Transfer Printing?
Whether you’re an aspiring or long-time crafter, you need to be prepared with the supplies you need for iron-on vinyl printing. Here are several supplies you need:
- Cutting machine (Silhouette, Brother, or Cricut machine)
- Cutting machine software (Cricut Design Space or Silhouette Software)
- Heat press machine
- Heat transfer vinyl of your choice (TeckWrap Craft or Cricut Iron-on vinyl)
- Cutting mat
- Weeding tool or tweezer
- Ruler or measuring tape
- Transfer tape (For multi-layer designs)
- Teflon sheet or parchment paper or thin cotton fabric
- Fabric of your choice (T-shirt or pillowcase)
Step-By_Step Instructions On How To Print Iron-On Vinyl On Garments
Now that you’re clear on the usage of heat transfer vinyl, that the clear plastic backing goes down it’s time to have clear instructions on how to print vinyl on garments. First of all, gather all supplies needed and prepare your workspace. Follow these step-by-step instructions:
Adjust The Size Of The Decal
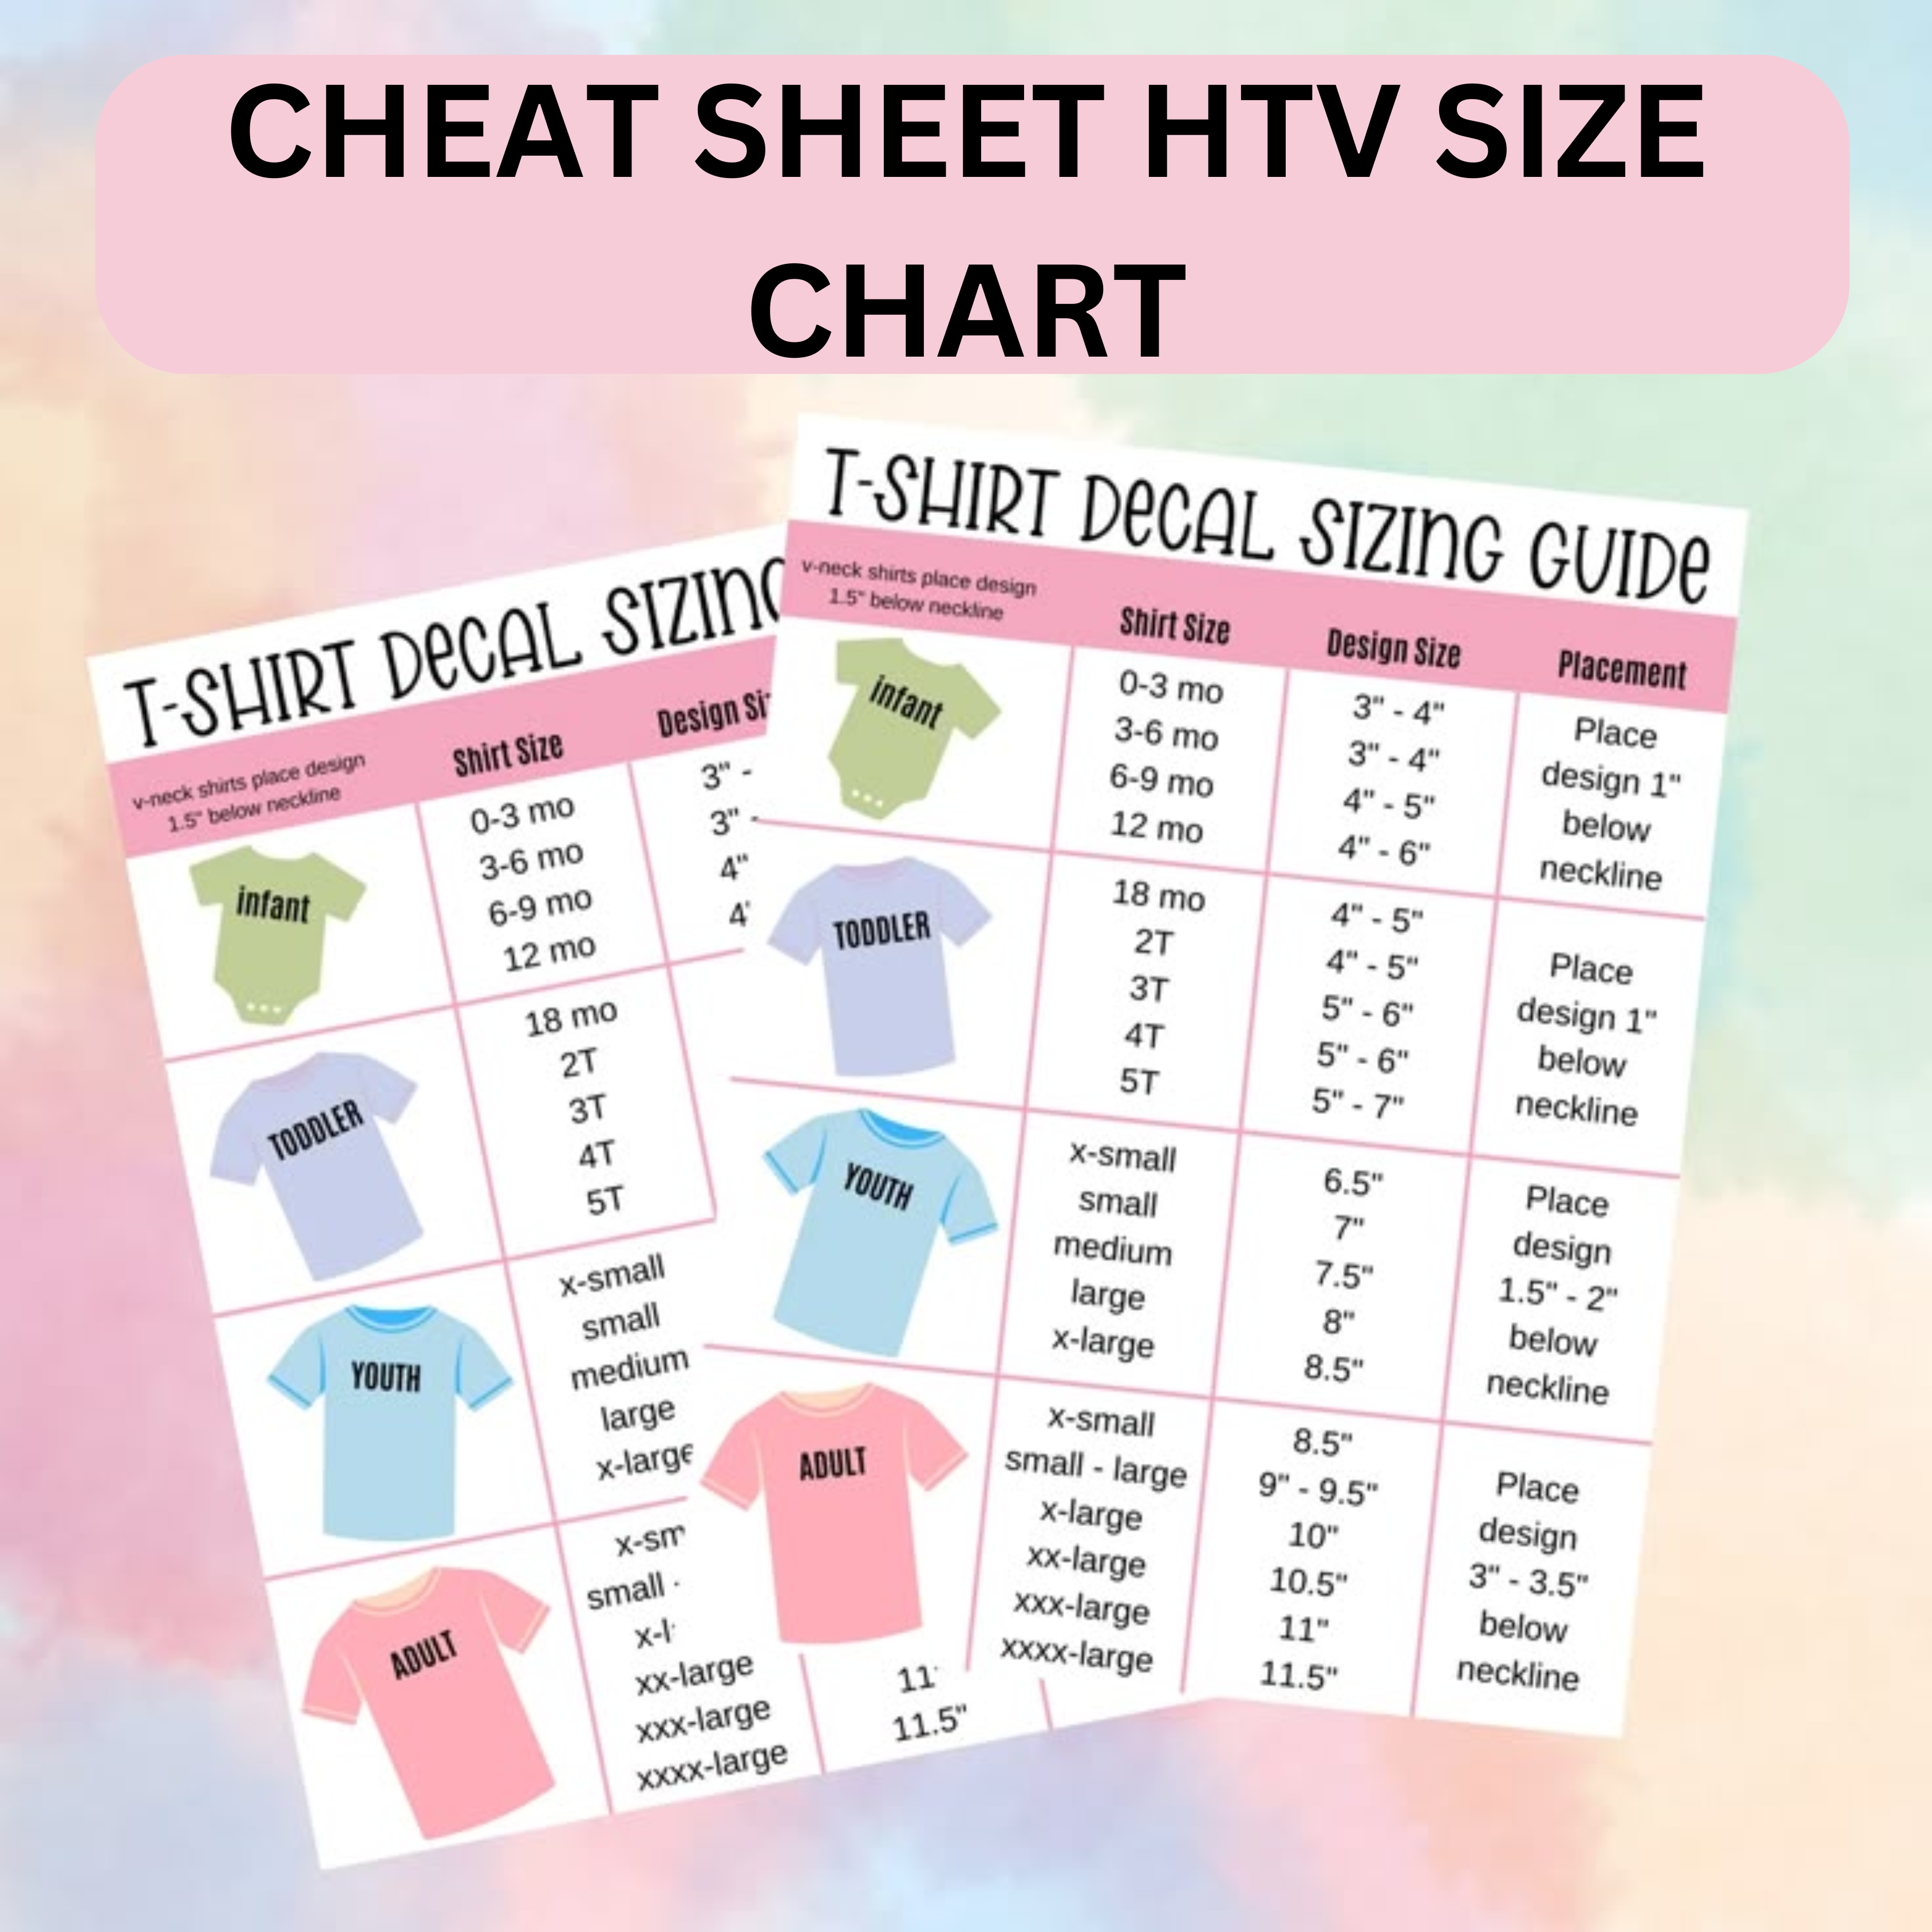
The next step is to measure the size of the decal. The decal size should be proportionate to the t-shirt size. You can use a ruler or measuring tape to determine the right size of the decal.
Make sure to read the Guide on Decal Size for Shirts for Vinyl Printing. Once you’ve determined the right size of the decal, adjust the size on the cutting machine software.

Mirror Image
Once you’ve adjusted the decal size, it’s time to mirror the design. Don’t ever forget this step! If you haven’t mirrored the design and have sent it to the cutting machine, the vinyl will go all to waste. Select the option ‘Flip Horizontally’.
Weed All The Excess Vinyl
Once the cutting process is done, remove the excess weed, otherwise called the weeding process. What does weeding mean? It means you need to remove the excess vinyl that you don’t want to be transferred to the garment.
You can use a weeding tool or tweezers to remove the excess vinyl. Place the clear plastic carrier sheet down and separate the adhesive vinyl from the plastic carrier sheet. Make sure to be careful with removing the excess cavity designs.
Heat Press Machine Time!
Prepare your heat press machine! Before you do this, you should know the right temperature, time, and pressure. If you’re using TeckWrap Craft vinyl, here is a summarized usage instruction of all the heat transfer vinyl available.
| TeckWrap Craft HTV | Heat Press Temperature (in ℉) | Time (in seconds) |
|---|---|---|
| Colorful Camouflage Heat Transfer | 300-315 ℉ | 10-15 |
| Flock HTV | 300-315 ℉ | 10-15 |
| PU HTV | 300-315 ℉ | 10-15 |
| PU Rainbow Stripes HTV | 266-284 ℉ | 8-12 |
| Glitter HTV | 300-315 ℉ | 10-15 |
| Colorful Splash HTV | 300-315 ℉ | 10-15 |
| Galaxy HTV | 266-284 ℉ | 8-12 |
| Glow In The Dark HTV | 300-320℉ | 8-12 |
| Snowflakes Pattern HTV | 300-315 ℉ | 10-15 |
You cannot use too much heat as this may melt the iron-on vinyl. Conversely, if there’s not too much heat, the iron-on vinyl won’t stick to the garment. TeckWrap Craft iron-on vinyl requires medium pressure under the heat press machine.
Also, be mindful of whether the vinyl is a cool peel, warm peel, or hot peel as it differs from brand to brand. TeckWrap Craft vinyl, for instance, is a cold peel vinyl. Then you’re done! Don’t fold or wash the shirt yet.
Care Instructions For T-Shirts Printed With Heat Transfer Vinyl
Now that you’ve learned which side of the iron-on vinyl goes down and the step-by-step instructions on how to print HTV on a garment, you should also impart knowledge to your clients or for your personal use, on the washing instructions of vinyl-printed garments. Here’s what you should know:
Don’t Wash The Garment For At Least 24 Hours After Pressing
Iron-on vinyl needs time to cure or to just sit. When the adhesive vinyl side gets activated by the heat, it needs time to harden and cool. You can do that by letting the HTV cure and let it sit. For HTV-printed garments, wait for at least 24 hours before folding, wearing, and washing them.
There’s a big chance the vinyl could crack or peel if it’s washed less than 24 hours after pressing. You can’t also wear it immediately because the sweat can loosen the iron-on vinyl because it has not been completely set yet.
Always Wash And Dry With The inside Out
24 hours after pressing the iron-on vinyl on the garment, you can now wash it. Before putting it in the washing machine or either washing it by hand, turn the shirt inside out. As much as possible the print should not be directly exposed to the water and detergent.
Use Warm Or Cold Water For Washing
Aside from washing the shirt inside out, you should use warm or cold water for washing. Never use water exceeding the temperature of 178°F. Anything exceeding that may cause the adhesive vinyl to weaken, peel or crack.
Do Not Dry Clean
Iron-on vinyl sticks to the garment thanks to the heating element. So when iron-on vinyl is once again exposed to heat, it may cause the HTV to peel off from the garment. In short, you do not dry clean an HTV-printed garment. It is recommended to hang-dry or dry in low settings HTV-printed shirts.
Only Use Mild Detergent
When washing HTV-printed garments, stay away from harsh detergents. Stay away from detergents with many special additives that advertise: whiten, fight stains, or bright colors. Only use a mild detergent in iron-on vinyl shirts. Also, do not use bleach and do not use a fabric softener on it.
Do Not Iron The Iron-On Vinyl Directly
As mentioned earlier, you can’t expose iron-on vinyl to heat. This means you should not iron on the vinyl directly. When pressing garments with HTV print, avoid the decal part. Just iron the whole shirt as it is but skip the decal part.
Project Ideas Using Iron-On Vinyl
At this point, we have clearly established that the shiny side of the vinyl should go down to the cutting mat. Now that you know that, you can create any heat transfer vinyl project you like. Here are project inspirations you can try at home:
1. Pillow Cases
Gift ideas? Partnering up with home stores? Then iron vinyl printed pillowcases are a great idea. It’s an excellent idea to print heat transfer vinyl on canvas material pillowcases, especially for throw pillows. For some, a sleeping pillow may be uncomfortable to sleep on with HTV printed on it.

2. Sweatshirts Or Hoodies
Is winter coming near? Or do you plan on selling varsity jackets to universities? Then a heat transfer vinyl printed on hoodies or sweatshirts are a great project idea. You can even start a clothing brand with this project idea.

3. Canvas Bags
Gifts for special occasions? Corporate giveaways business ideas? Iron-on vinyl printed on canvas materials will always be a hit. Not only are you advocating for reducing the use of plastic, but you’re creating pretty bags as well. You can also pitch this business idea to local businesses to replace plastic bags with the use of reusable canvas shopping bags.

4. T-Shirts
What’s great about printing on t-shirts is you can create any design. You can print on a shirt with an entire design, a small basic shape, a monogram design, and many more. Vinyl-printed shirts are great merchandise to start a clothing brand.

5. Denim Jackets And Pants
Do you know you can print vinyl on denim garments? Oh yes, you can! The challenge may be denim garments do not have a flat surface. Just like the photo of a denim jacket shown above, only the flat surface has print on it.

You can redesign your old jeans and print iron-on vinyl on them. Or you can buy used denim from thrift stores and place cute decals on it. Post them online, and start your one-of-a-kind clothing brand.
Frequently Asked Questions
To Conclude
To summarize the thought of this whole post, you just have to remember that the glossy side of the iron vinyl should face down on the cutting mat when loaded into the cutting machine. The dull side of the adhesive itself must face the cutting machine’s blade.
Also, don’t forget to mirror your design on the software! Now that you know all of the steps and tips above, you are now ready to create wonderful shirt designs. Who knows? Maybe a thriving clothing brand in the future!